Friday, January 21, 2011

You win this time, Crochet...

I am a knitter.  I like to knit.  I DO NOT like to crochet.  I own crochet hooks, but they've mainly been used to finish knitting projects, when I can't find a tapestry needle.  I do know how to crochet... at least, I know some of the basics.  I just don't really enjoy crochet because I always hold the yarn too tight, or I go through the wrong loop, or something.  But for certain things, you just can't use knitting... so I once again gave crochet a chance.

I saw this: How to Crochet a Heart and decided that I could make some pretty cute stuff with hearts.  Normally, I'm not a "heart person."  By that I mean that I've never been particularly attracted to the design... but sometimes I just get in a mood for something and I can't get enough of it.  And with Valentine's day coming, I thought I might make some garlands and such for my Widgetorium.

I did find that the yarn I used made the holes in the center too big, so I adjusted the pattern (which made it easier and faster to make).  This is a great way to use those little balls of yarn you might have sitting around.  Here is the pattern (with picture guides for the stitches).

Crochet Heart Pattern

Supplies:
  • crochet hook (you might need to play with size, based on your yarn, I used a size F)
  • 1 1/2 yards of Yarn (I used red heart acrylic yarn, it takes about 50" but I rounded up. The amount/size/finished product will be slightly different, depending on what you use)

All stitches are worked into the first chain.

Cast on.

Chain (Ch) 4

Work 2 Triple Crochet (tr) into the first chain

 Work 2 Double Crochet (dc) into the first ch

ch 1
1 tr into first ch
ch 1
2 dc into first ch
2 tr into first ch
ch 3

slip stitch into first ch and fasten off

Pull the two ends tight

 Flatten out the heart and you're done!


Hopefully the pictures and instructions made sense, I figured out how to do it from this video.  From there, you can make all kinds of things with these.  Here is one example:

Wednesday, January 19, 2011

Things I did Yesterday

Rather than a usual post, I'm going to just tell you all what I did yesterday... mainly because I'm pretty excited about what happened and what I did.

I had some errands to run, and I was also on the look out for some buttons (I need to fix a sweater that I've had for a while, but I don't have enough buttons for it), so I decided to stop by our local SPCA thrift store.  I wasn't really convinced that they'd have what I needed, but it was worth a stop, since I was out anyway.

Artisan Bread in Five Minutes a Day: The Discovery That Revolutionizes Home BakingI should also mention that I've been looking for a 6 quart food storage container, because I want to make Artisan Bread in 5 min.  Since I couldn't find any 6 quart containers in any of the stores near me, I ordered them online.  They also had a deal to include the Danish Dough Whisk for $9.  I decided that $9 was too much to spend on a one-use item, even if I would be using it often.

While I was wandering around at the thrift store, I found their prices were really good.  They have deals everyday, it seems... when I was there, the clothes were buy 1 get 1 free.  I didn't need any clothing, but it was nice to know that I could get really inexpensive clothing that could be altered, if I have the time.  While wandering, I didn't find any buttons... but I did find this:

And the price? $1!  Yup, got myself a really good Danish Dough Whisk for $1!  And when I went to the counter to pay for it, I asked if they had any buttons... the helpful man behind the counter said that I was in luck, because a girl had asked them to save buttons for her, but she hadn't come by to pick them up even after they called her.  So I could have them.  All of them for $10!

I had fun sorting them last night :)
 So, $11 later I'm the proud owner of a Danish Dough Whisk, and a bunch of exciting buttons!

Later in the day, I saw a recipe for Soft Pretzel Bites (from one of the blogs I follow), and I figured I may as well try it out.  I'd also stopped at Trader Joes and picked up some much needed dairy products for baking scones/cinnamon rolls/etc.  So after I got home, I started baking... and kept baking until I had this:

Cinnamon Rolls, Cranberry Scones,and Pretzel bites/rolls
I altered the recipe for the scones a little, I substituted 1/4 cup of vanilla soy protein powder for 1/4 of the whole wheat flour from the original recipe.  So the new measurements are: 1 1/2 cup All purpose flour, 1/4 cup Whole wheat flour, 1/4 cup vanilla Soy protein powder.  I also used whole milk instead of cream.  They taste really good.  Slightly sweet, slightly vanilla, and very delicious.  I originally had a lot more of the soft pretzels, but they got eaten before I had a chance to photograph them... I'll have to post about the pretzel rolls later, since they're a story in themselves.

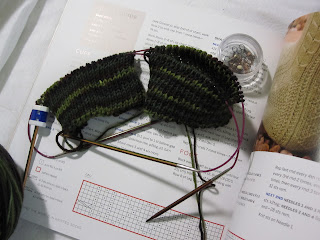
Also, here's the current progress on the socks (I'll do a full post when they're done):
2 socks at once! No second sock syndrome for me!

Monday, January 17, 2011

Chicken Pot Pie

The other day I went ahead and bought a 25lbs bag of flour at Costco. I also bought some boneless skinless chicken thighs. I had been buying chicken breasts, but the thighs were so much less expensive... and then I cooked with them and discovered how much more flavor the thighs had, I'm very pleased that I bought them.

It's cold and damp where I am right now, and it felt about the right time for some good old fashioned comfort food.

I've never made Chicken Pot Pie before, and so I set out to make one. I started with the 1896 Boston Cooking-School Cookbook, the plain paste recipe, to be specific.  Then I just sort of thought about what is normally in chicken pot pie and went from there.

***

The Lazy Wife's Chicken Pot Pie

Pie Crust:
1 1/2 cup flour
1/2 cup butter, cut in cubes
2 Tbsp vodka
2 Tbsp cold water

My crust ended up being a little thin, but very flaky and delicious, next time I'd probably double the pastry recipe, then again, I did end up making two pies. 

Put flour in a medium bowl and cut in the butter cubes.  Add vodka and water until you can form a smooth ball (sometimes it requires a little more vodka or water if your flour is dry).  Place the smooth ball in plastic wrap and chill for about 15min.  Preheat the oven to 350 degrees, roll out the chilled dough on a lightly floured surface, and place in pie pan.  Cover with wax paper and pie weights (I use beans).  Prebake for about 10 min with the weights, then remove them and bake another 5-10min until it just starts to get a light brown color.  Remove from oven and fill with chicken filling.
 
Pie filling:
1-2 Tbsp olive oil
1 onion, chopped
8-10 cloves garlic, minced
3 boneless skinless chicken thighs, cubed
1/2 cup frozen corn
1/2 cup frozen peas
1/2 cup mixed vegetables (I like the "hodgepodge"  mix from Trader Joes)
1 carrot, chopped
1 can condensed potato soup
1 Tbsp Herbed Poultry (from my spice rack, I think it's Sage, Rosemary, Thyme and Marjoram)
1 tsp Worcestershire sauce
1 Tbsp flour
1 Tbsp butter
Salt & Pepper
In a medium pot, saute the onion and garlic in olive oil, on low heat, until soft.  Add herbs, salt and pepper (about 1 tsp of each), add chicken and continue cooking, turn up to medium heat, stirring occasionally.  When the chicken is cooked, add vegetables and soup (as well as 1 can of water).  Stir until all ingredients are combined.  Add flour and butter and stir until incorporated.  Cook down to thicken.

When the pie crusts are ready (prebaked/just starting to brown, you can use scraps of pie crust to put on top for a cute decoration, bake them with the crusts but on a separate baking sheet) add the chicken filling to the pie shells and bake at 350 for 20min until the crusts are brown and the filling is bubbling.

Take out of oven and serve.

***

Well, that's about it for the recipe.  It tastes pretty darn awesome (the Husband even went back for seconds, despite the pie containing peas).  Chicken breast would obviously work as well, but I really do think the thighs have better flavor.

Also, I'm working on a pair of socks now... but I'll post about those later, when I have pictures and such.  That's all for now!

Saturday, January 8, 2011

Hummus

My husband was recently bothering me because I had not made hummus last semester.  So, by request, I made hummus today.

Hummus is a Middle Eastern staple food.  When eaten with bread it makes a complete protein, which is awesome especially if you're vegetarian or vegan (though understandably less awesome if you suffer from Celiac disease).  Hummus is actually pretty easy to make.  It relies heavily on taste... so be sure you're tasting as you go.  So, here's my recipe, feel free to play with it and adjust as you like.

***


Hummus, ala the Lazy Wife

1 lb bag dried chickpeas (you can, of course, use canned chickpeas, dried are sometimes cheaper)
Water
1 head of Garlic, minced
The juice of 2 Lemons
1/3 - 1/2 cup Tahini (Sesame seed paste)
1/2 cup Olive Oil
Salt to taste
Optional Hand full of Sun Dried Tomato, Red Pepper, Paprika, Basil, Avocado, Chipotle pepper, etc.

For the Hummus purists (No optional extras):
Soak the dry chickpeas in water overnight.  Drain the old water and cover the now plumped peas with water by about an inch over the level of the peas... it's not important to get the water quantity exact for these steps, just to make sure the peas absorb as much water as they need to become soft.  Bring the peas to a boil, cover and reduce heat to simmer.

My chickpeas have always boil over... but uncovered they smell funny, so choose your poison.
Lower: cooked peas, top left: pea skins, top right: naked peas

Once the chickpeas are soft (30min - 2 hours). It really depends on how much attention I'm paying... when they're soft to the touch (squish one between your fingers after letting it cool and see if it mashes easily) turn off the heat and let them cool.

Hummus with Sun Dried Tomato and dried red pepper
Hummus with olive oil and paprika
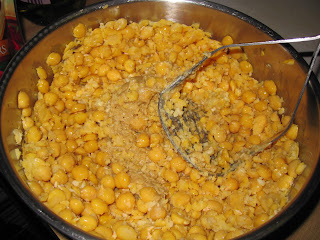
When you can handle them, strain the chickpeas and prepare for the "fun" part.  Now, some people just leave them in water and roll them around in their fingers to remove the skins, because the skins, for the most part, rise to the top and can be skimmed off.  I, however, am a perfectionist.  I sit down and watch something while I squeeze the skin off of each and every pea.  My other reason for this is because I do not own a food processor, and mash the peas with a potato masher, and I get a better consistency when I remove every skin.  If you don't care about texture or are blessed with a food processor, then go ahead and remove as much of the skins in whatever way you like.

After removing all the skins, put the peas in a medium to large size bowl.  Add the garlic, lemon juice, tahini, olive oil and some salt, and mash until you get a nice smooth paste.

Some of the ingredient amounts can vary depending on how moist or dry your chickpeas are, and how much you like or dislike certain flavors.  I happen to LOVE garlic, so I used a whole head... just enough to almost give me heartburn.  If you don't like garlic so much, then use 1-5 cloves or whatever you like.

If you find the mashing is not giving you a nice smooth paste, then add a little more tahini, olive oil or lemon juice, depending also on what flavor you think is lacking.  You do have to play with it a little, to get the right taste for your pallet.

If you're feeling a little more adventurous,  you can experiment a little more.

Make the original recipe, but at the end stir in some chopped up sun dried tomato, or some red pepper, or avocado... I know at the farmer's market I used to go to, there was a guy that had all kinds of interesting flavors of hummus.

In most of the Middle Eastern restaurants I've been to, they serve hummus with olive oil and paprika on it.

If you can't find tahini (which I couldn't for a while where I am) I substituted smooth peanut butter!  I know!  Sounds totally crazy, right?!  Well, I did, but I used a little less peanut butter and a little more olive oil and lemon juice, and lots of garlic.  Once it sat for a day in the refrigerator, it tasted pretty much the same as regular hummus, with maybe a little more of a nutty aftertaste.

***

The historical origins of Hummus are unknown.  The earliest verified description of hummus comes from 18th century Damascus.  There were probably similar recipes before the 18th century, and in fact, the Egyptians ate a similar dish that used vinegar instead of lemon juice (which was the ingredient that arrived in the middle east later than all the others).  But it is still unknown where or when hummus, as we know it today, was first made.

Chickpeas are GREAT! Chickpeas are a good source of zinc, folate, and protein.  They have a lot of dietary fiber and are a good source of carbohydrates (especially for people that are insulin sensitive/diabetics).  They also contain phosphorus, magnesium and iron.

Citations: Wikipedia: Hummus, Chickpea